Executing Code on the Client

Jeff Taylor-Chang

Jeff Taylor-Chang

Frontend Dev for Actually Colab

The Problem#

Server-side execution of code is great because it requires minimal setup from the user and potentially offers the ability to use more powerful machines and GPUs the client may not have. The issue with server-side execution is that we then take on the cost of spawning and hosting many containers in the cloud which becomes expensive quickly. This is one of the reasons that the tools on the market that offer real-time collaboration are so expensive since they have all opted to run code server-side. They are trading convenience for cost, and for plenty of companies or individuals with large budgets that's often perfectly acceptable and sometimes even preferred. However, since we are building a service aimed at keeping costs as low as possible to make the service accessible to people who otherwise couldn't afford these tools, we had to come up with a different approach.

Client-side Execution#

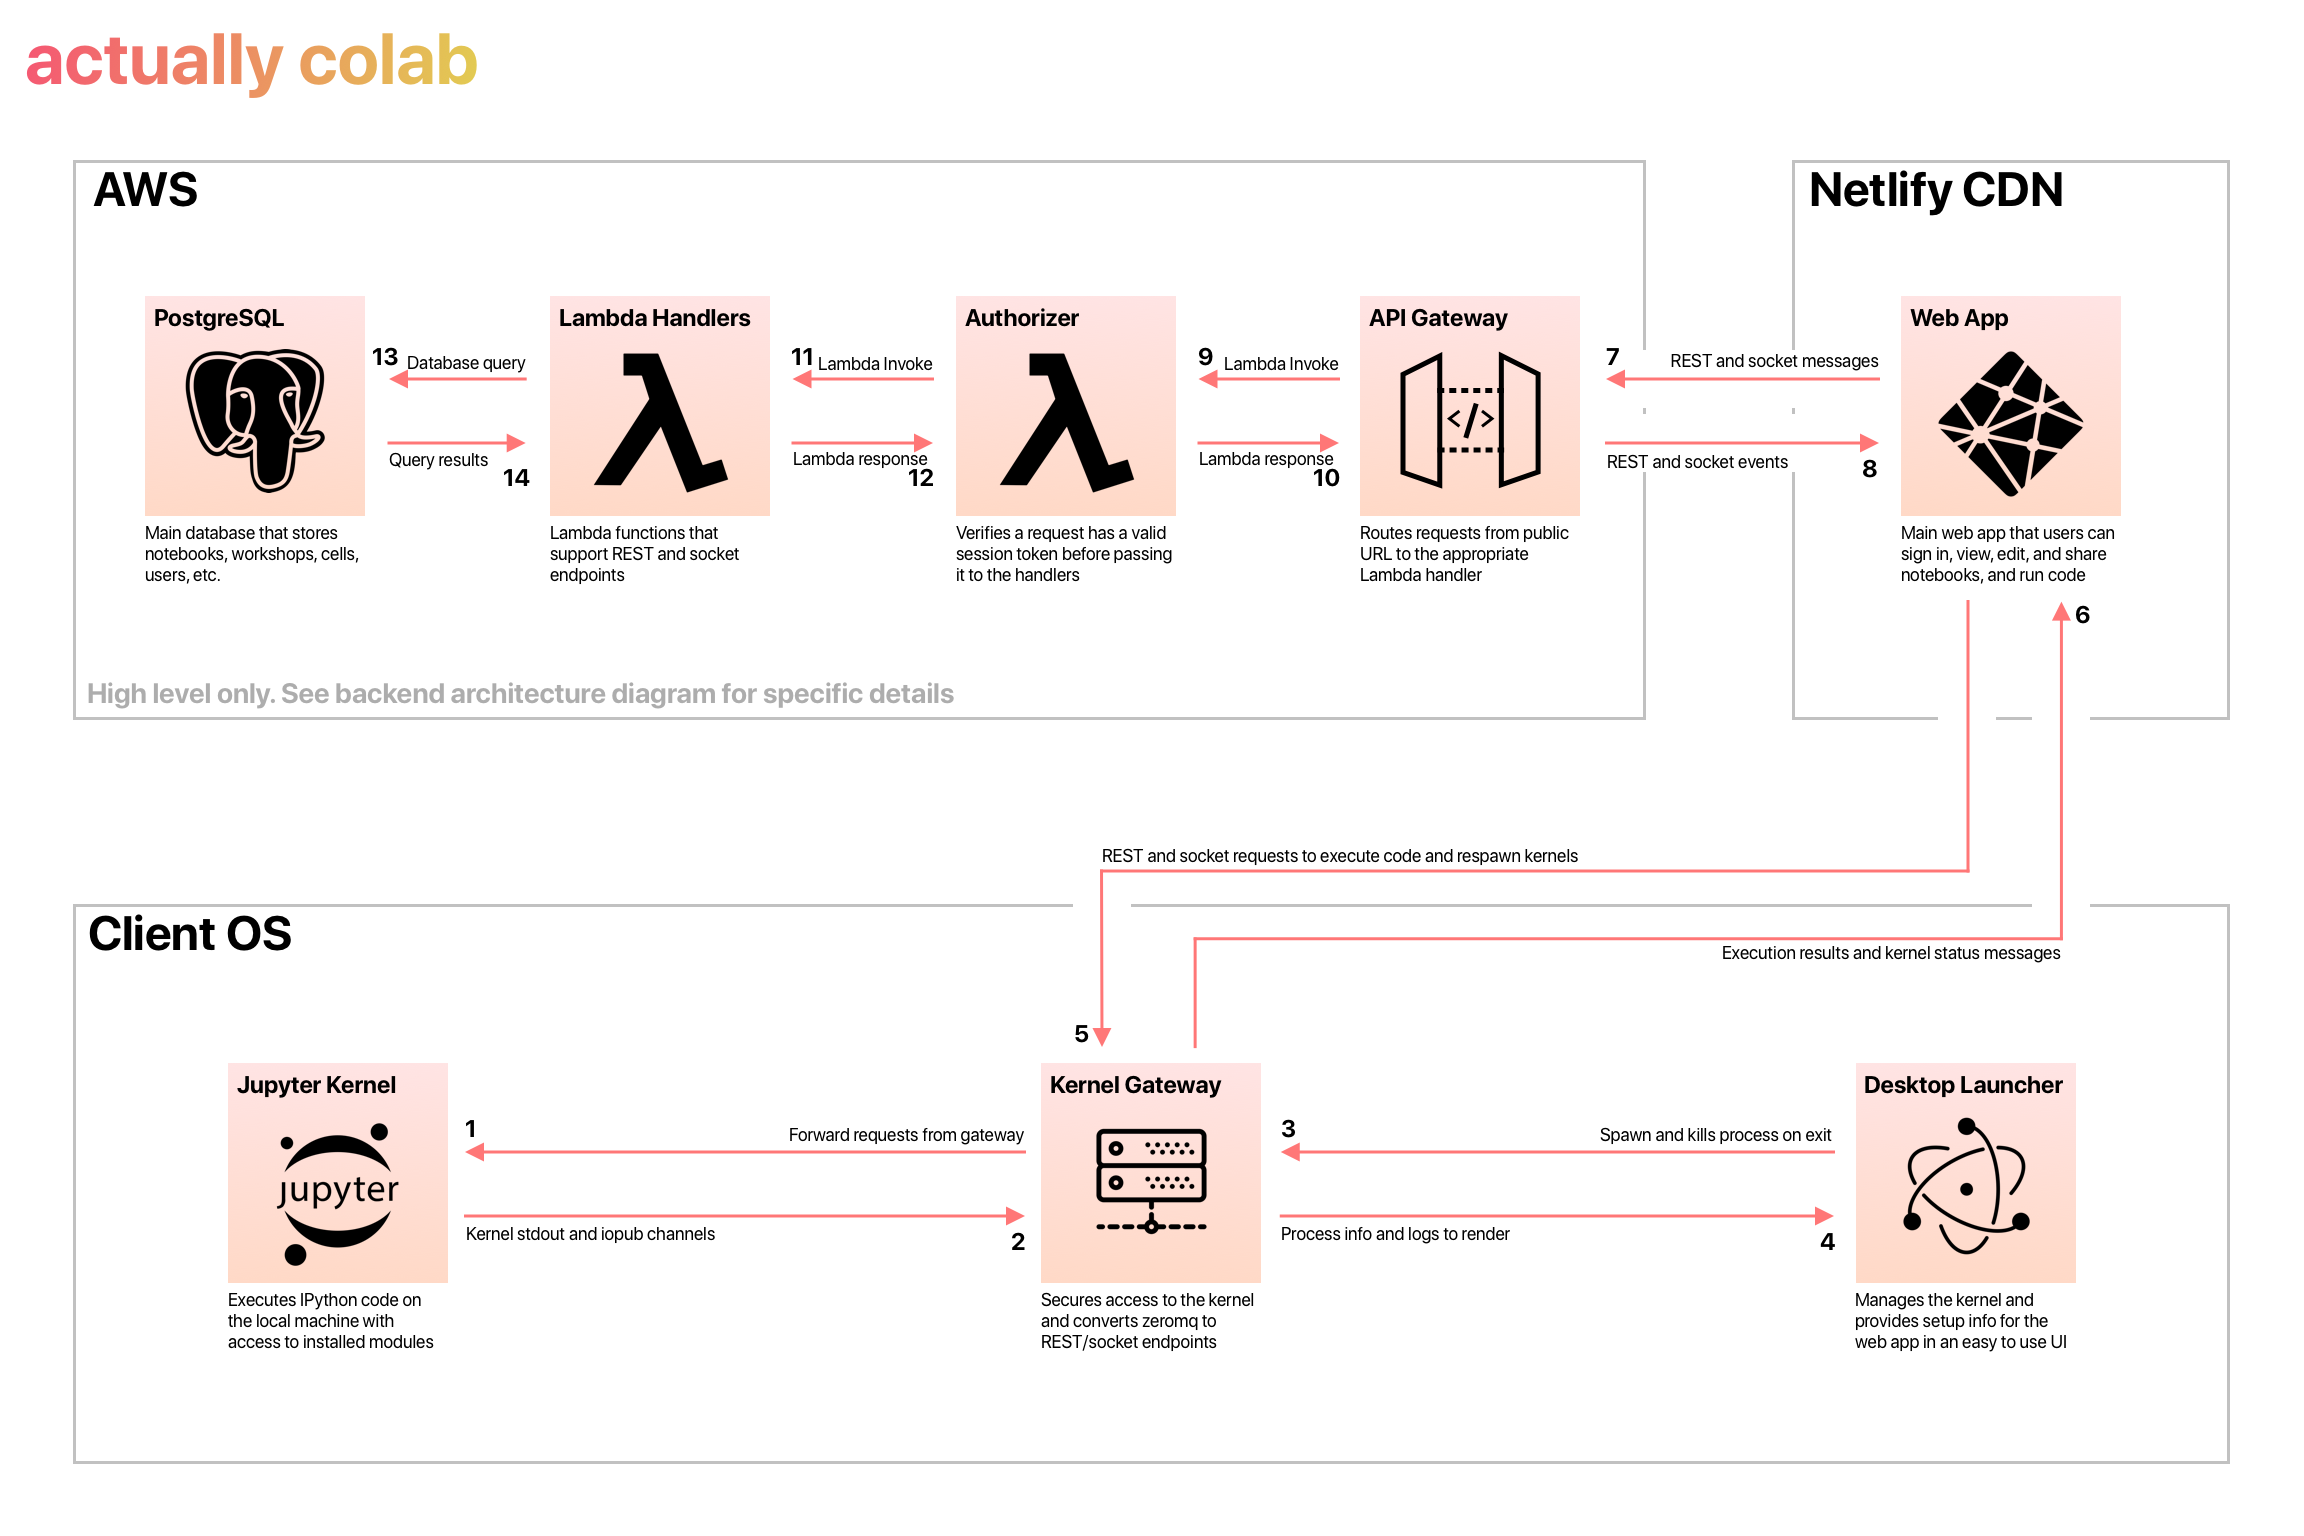
We decided to take a page from the classic Jupyter Notebook that started it all. The Jupyter Notebook, when run locally, interacts with a IPython Kernel instance on your local machine. This means that when you are running code in the notebook editor, you are executing code using dependencies installed on your computer as well as with access to files on your local disk. Since we wouldn't host the Kernel on our servers, this dramatically reduced what our server costs would be and allowed us to build a serverless (Lambda) architecture without spawning containers. This allows us to deliver a much more cost-efficient service and those cost-savings are directly passed to our users. That being said, it has some obvious disadvantages when applied to a collaborative cloud editor, namely there is no guarantee that everyone has the same dependencies unlike in a controlled server-side environment. That's a problem we will tackle in the future, but the first step was configuring our cloud editor to run code directly on the client.

Initial Approach with Electron#

Our first instinct was to build our editor as an Electron app which would provide us with access to the client's machine and allow us to execute commands and spawn processes. We created a hidden renderer process that spawned and managed a Kernel instance on the client's machine and communicated with the editor via IPC messaging. This worked great, and we had a working Proof-of-Concept in a matter of hours. One drawback we quickly realized however was that we had limited the accessibility to our application.

  • It would require that we build MacOS, Windows, and Linux builds of the application regularly and distribute them to users, making it difficult to update the editor rapidly.
  • Not everyone needs to run outputs when working on a team and so we had introduced a hard native dependency on something that otherwise could be easily accessible in the browser.
  • Integrating OAuth became considerably more complex because it required spawning a browser window that then redirected to the desktop application

Separating the Kernel from the Editor#

Once we had decided that it would be better to build a web editor, we had to figure out how to handle the connection between the kernel and the editor. What we did is separate our codebase and convert the Electron application into just a simple UI that allowed the user to monitor the kernel process without looking at a terminal. We also used the Jupyter Kernel Gateway to convert the ZeroMQ messages that the Kernel normally uses into REST and websocket endpoints that our browser-based editor could use more easily. Finally we made the browser-based version of the editor automatically check to see if it can connect to the kernel and allowed users to configure their kernel gateway URI in the editor. This had some interesting implications:

  • The native Electron application became entirely optional. Users who wish to have more control over the process can run the Kernel Gateway in the terminal using commands documented in our launcher's README
  • The user could, in theory, connect to a Kernel that isn't on their own machine since the gateway URI is configurable. This would allow the user to spawn the Kernel Gateway on a VM on AWS for instance and then connect remotely for more power while keeping the editor UI in their local browser

Architecture diagram

Creating a Memoized Debounced Function with Lodash

Bailey Tincher

Bailey Tincher

Backend Dev for Actually Colab

The Problem#

Creating a real-time collaborative text editor is a balance between performance and efficiency. We want keystrokes to appear live to other users, but, practically, what does that actually mean? With some having a typing speed in excess of 5 characters per second, it seems unnecessary to send a request every two-tenths of a second for each keystroke. To reduce the volume of requests being made we can group a series of edits together and send them in chunks. This way, rather than sending 1 character per request, we send groups of 3 or 4 characters instead.

This approach is often referred to as debouncing requests.

Initial Approach with Lodash#

Common utility libraries in JavaScript exist to debounce such as Lodash.

_.debounce(func, [wait=0], [options={}])

Looking at the signature, it accepts the function to debounce and the number of milliseconds to delay as arguments. This is great and does exactly what it claims. Let's see what this would look like with our text editor.

const edit = (id: string, contents: string) => { ... };
const debouncedEdit = _.debounce(edit, 500, { maxWait: 1000 });
debouncedEdit(someId, '.');
// 300ms later
debouncedEdit(someId, '...');

This seems to do the trick. Though two function calls are made that make a request to our server, only the final one will get executed since it was called before our 500ms debounce window. Let's look at another scenario.

debouncedEdit(someId, '.');
// 300ms later
debouncedEdit(otherId, '?');

In this case, our user is super fast and switches which editor they are working in and types another character before our 500ms debounce window. As a result, the first call to update the contents of cell someId never gets triggered.

This reflects a key shortcoming with Lodash's debounce. It has no regard for the parameters being passed to the function and instead will simply reset with each call. Unfortunately, none of Lodash's optional parameters for debounce can help us get around this.

The Memoized Debounce#

To create a debounce function that discriminates based on the parameters being passed to it, we'll need a custom option. Some ideas were discussed on this issue thread that inspired my approach. The thread had some working prototypes, but they were not compatible with TypeScript.

Lodash's TypeScript support is peculiar, but I did my best to work around it.

import _ from 'lodash';
// eslint-disable-next-line @typescript-eslint/no-explicit-any
type AnyFunction = (...args: any[]) => any;
export interface MemoizeDebouncedFunction<F extends AnyFunction>
extends _.DebouncedFunc<F> {
(...args: Parameters<F>): ReturnType<F> | undefined;
flush: (...args: Parameters<F>) => ReturnType<F> | undefined;
cancel: (...args: Parameters<F>) => void;
}
/**Combines Lodash's _.debounce with _.memoize to allow for debouncing
* based on parameters passed to the function during runtime.
*
* @param func The function to debounce.
* @param wait The number of milliseconds to delay.
* @param options Lodash debounce options object.
* @param resolver The function to resolve the cache key.
*/
export function memoizeDebounce<F extends AnyFunction>(
func: F,
wait = 0,
options: _.DebounceSettings = {},
resolver?: (...args: Parameters<F>) => unknown
): MemoizeDebouncedFunction<F> {
const debounceMemo = _.memoize<(...args: Parameters<F>) => _.DebouncedFunc<F>>(
// eslint-disable-next-line @typescript-eslint/no-unused-vars
(..._args: Parameters<F>) => _.debounce(func, wait, options),
resolver
);
function wrappedFunction(
this: MemoizeDebouncedFunction<F>,
...args: Parameters<F>
): ReturnType<F> | undefined {
return debounceMemo(...args)(...args);
}
const flush: MemoizeDebouncedFunction<F>['flush'] = (...args) => {
return debounceMemo(...args).flush();
};
const cancel: MemoizeDebouncedFunction<F>['cancel'] = (...args) => {
return debounceMemo(...args).cancel();
};
wrappedFunction.flush = flush;
wrappedFunction.cancel = cancel;
return wrappedFunction;
}

Now we can put it to use to solve our original problem.

const edit = (id: string, contents: string) => { ... };
// Create a cache key for memoize based on the id
const memoizeDebounceEditResolver = (id: string, _contents: string) => id;
const memoizeDebouncedEdit = memoizeDebounce(edit, 500, { maxWait: 1000 }, memoizeDebounceEditResolver);

And then we use it just like a normal function!

memoizeDebouncedEdit(someId, '.'); // Won't get sent
// 300ms later
memoizeDebouncedEdit(someId, '...'); // Will get sent
// 300ms later
memoizeDebouncedEdit(otherId, '?'); // Will get sent

Unlike the original debouncedEdit, in this case both requests to edit someId and otherId will be completed.